|
|
|
||||||||
|
|
|
||||||||
Big Red - 1973 GT6 MKIII Specific Tasks and Procedures |
||||||||||||
|
||||||||||||
|
||||||||||||
|
||||||||||||
| Wow! all these bolts are frozen solid. ...soak 'em in PB Blaster... I'll be back.... | |
|
 Well almost every suspension mount bolt
was frozen solid to its bushing tube. So out came the angle grinder and cut off wheel.
Even the big bolts on the outer lower trunnion, had to have its head ground off or cut off
to separate things Well almost every suspension mount bolt
was frozen solid to its bushing tube. So out came the angle grinder and cut off wheel.
Even the big bolts on the outer lower trunnion, had to have its head ground off or cut off
to separate things |
|
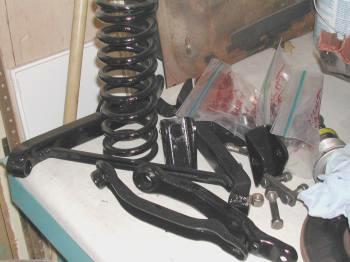
I cheated. I ended up taking everything off the chassis, and separated the components on the work bench. Everything after disassembly, degreasing, wire-wheeling, sanding, priming and re-painting. I used gloss black paint for the a-arms, mounts and springs. Yes..those springs WERE chrome, as they are Carrera shocks. I guess four years of sitting around dirty... |
 (wire wheeled, sanded and primed) |
the chrome didn't fare well, as
it simply flaked off or rusted. The plastic zip-lock baggies are the assortments of
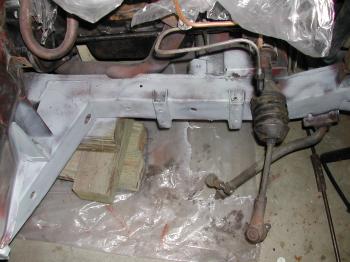
bolts for each a-arm set. The frame was wire-wheeled, sanded, and here...in primer. After a few coats and intermediate sanding, it's now ready for final painting and re-assembly. |
 (first coat using the PPG Deltron Acrylic Enamel) |
Well the little Preval spray units worked great
here. Good coverage, with very little over-spray, since I could control the thickness of
the paint. OH NO... It doesn't match the color on the car! woah.... OK... as it's drying... it's getting darker... <sigh> wow! ...Thought I was going to have to paint the whole car. OK...now (three hours later) looks like a match. :-)
|
|
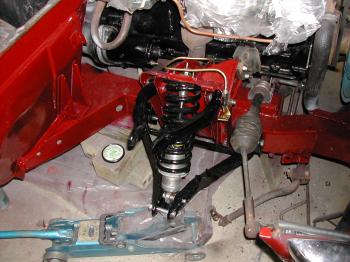
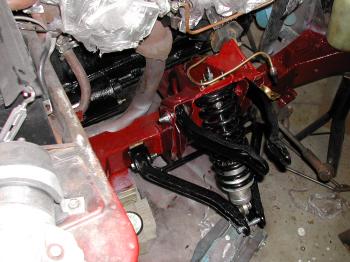
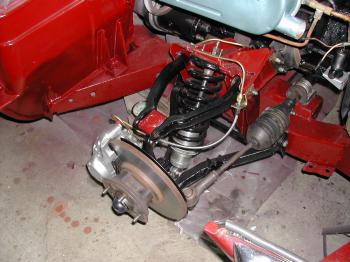
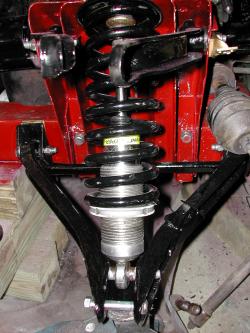
The newer replacement GT6 shock tower is now back in place
after it's cleanup and paint job. The a-arms are in with all new nuts and bolts. The
original poly bushes (on the car when I bought it) were re-used. The Carrera shock was
cleaned up and buffed a bit to restore it to like new condition. ...can't say I'm happy with the upper shock mount rubbers the suppliers are selling these days. The old ones were more like 'donuts' the full size of the spring pan bushing seat in diameter. Two 'new' sets from two different suppliers, are all more like little fat short 'tubes', half the diameter of the bush seat. You really have to tighten down the top shock nuts a lot, to compress them to fill-in the bushing seat on the spring pan. |
| Yes...that's a Carrera shock there. The lower spring seat is adjustable for ride height, and the bump/rebound is independently adjustable. The original chrome on the coil spring is long gone. Heavy wire wheeling and sanding, got rid of what little remained. A nice gloss black, really stands out against the chrome and aluminum shock body. The lower spring support ring is adjustable for ride height. |
 |
|
|
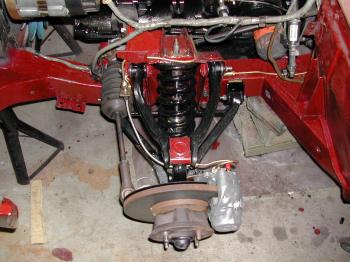
| Before the calipers were installed, new seals were installed and they were bench bled.The brake calipers also were cleaned up and got a coat of silver high heat engine paint. The upper ball joints were painted body color (had some paint in the bottle still) rather than leave them raw metal to rust. I also installed stainless steel flexible brake lines for a more solid peddle. The metal brake lines were sanded and painted gold. The rotors have been turned and are well within spec thickness. New brake pads were installed to complete the front suspension rebuild.
|
|
©1987-2008
All material copyright© Teglerizer 1996-2008last edited 03/18/10

hits since last reset


index