|
|
|
||||||||
|
|
|
||||||||
Big Red - 1973 GT6 MKIII Specific Tasks and Procedures |
||||||||||||
|
||||||||||||
|
||||||||||||
|
||||||||||||
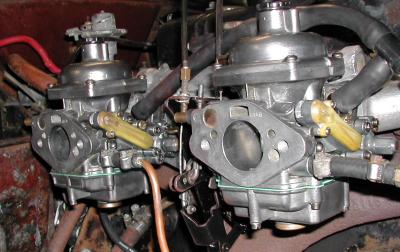
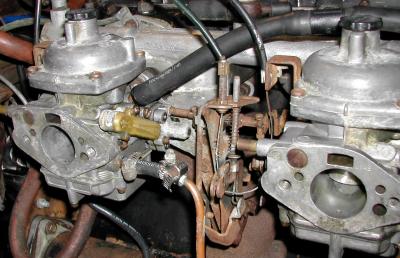
| With Big Red in my driveway for the first time it was a bit hard to keep it running without holding the throttle open. With a constant 12%CO reading, I knew they needed major work. So the first parts I bought for the rebuild of this GT6 were carb rebuild kits. Well to start with, watch which carb rebuild kit you get. Odds are, you won't get a kit that has all the proper gaskets for your particular version of the Zenith Stromberg CD150 carb. I thought I knew these carbs, until I bought Big Red. These CD150's are CDSEV models. What's the V? It took me awhile to realize this pair have little float bowl valves that close off the bowl vent if you drop the throttle abruptly. The valve is activated under the throttle stop lever on the side of the carb. This was suppose to stop the over rich condition on sudden deceleration. The adjustable air bypass valve, typical of the CDSE used on late Spitfires, has a gasket under it that allows air to pass behind it regardless of valve setting. On the CDSEV, the gasket is solid (no figure eight hole) to completely seal off the passage. So save you old gaskets. The bypass valve is not adjustable. It's innards have the valve set to stay permanently closed. An adjustable idle CO2 screw and the temperature compensator valve replace it on these carbs. The manual choke mounts where the water choke mounts. But no gasket. This pair had Gross Jets (the little ball valves ) installed, which I promptly replaced with the stock needle jets with filter screens, supplied in the kit. The P.O. had placed a washer under the Gross jet, and simply bent the float tang down to meet the valve. Needless to say, the two carbs did not match nor was the level anywhere near the proper settings (0.725 -0.775" above the bridge). The temperature compensator valves, and adjustable 'idle mixture screw' take the place of the 'float valve'. The P.O. had cranked down the nut so tight the bi-metal arms were badly bent. I hammered them flat and then spent about 4 hours over the stove, trying to get both of them to 'flex' the same amount at the same temperatures. In normal use DO NOT TOUCH these temperature compensator unit innards. You'll regret it. Maybe this is why the P.O. bent them forcing them to stay closed all the time. Hence the minimum initial 12%CO2 as a minimum I was able to get before the rebuild.
|
 before the rebuild... all corroded, leaky, and WAY out of adjustment
Well I can't say I'm happy with the way they run...but I blame that on a few other engine parameter settings. The CO2 is now at 5%. Still rich,but good enough to start and idle nicely at 825-850 rpm. At least I can rely on it starting. It runs fine at 3000 rpm with a CO2 reading hovering at 3.4%. I'll bust out the wide band 02 later. Now I feel comfortable starting it and moving it around the driveway to work on it. |
©1987-2008
All material copyright© Teglerizer 1996-2008last edited 03/18/10

hits since last reset


index