|
|
|
||||||||
|
|
|
||||||||
Big Red - 1973 GT6 MKIII Specific Tasks and Procedures |
||||||||||||
|
||||||||||||
|
||||||||||||
|
||||||||||||
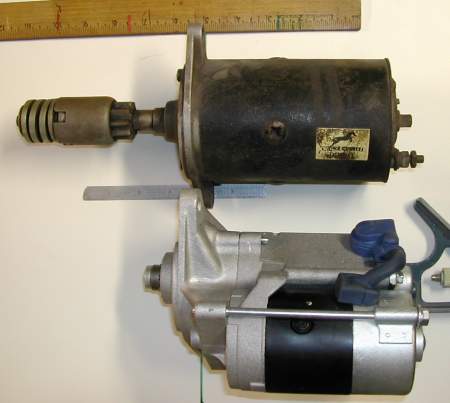
| Well.... yep,
I went and did it. I swapped out the old Lucas starter for a 1989 Isuzu Trooper II
(2.6L) starter. Why? Simple! They're a lot cheaper than a new or rebuilt Lucas starter,
and spin the motor more readily on a lower battery voltage. Considering the stock
Lucas starter is the same one used on the MG Midget and Triumph Spitfire (among others)
four cylinder engines, needless to say, this same starter on a 6 cylinder engine is
marginal at best. You'll find MANY 'designer' high torque starters on EBay. Normally they want in the neighborhood of $150-$180 for one that will fit a GT6. What you'd be paying for is the same Nipondenso starter, with a custom machined mount plate. Well considering a 'stock' Trooper II starter is only around $65.00.... I can't see the mount plate being worth $90+ ! Most Autozone's (where I bought mine) will charge you a $25 core charge. Just turn in your old Lucas starter and get your $25 back, and that will cover the cost of modifying your current starter mount plate. The part number is 16878. This is what they call the 'large bodied' version. What exactly that means I have no idea! |
|
|
The old Lucas
starter gear moves towards the body of the motor on starting. The Trooper starter 'pops
out' to engage the gears. Both bodies are roughly the same size. The actual starter
motor on the Trooper starter is smaller and is 'piggy-backed' on the side of the main
body. The main body is actually a large solenoid, built right into the starter. It
acts as the solenoid and the mechanism to 'pop-out' the drive gear at the same time.
Even with the 'humpback' hanging off the side of the starter, there are absolutely
no clearance issues with the engine block, chassis rails or exhaust system.
|
|
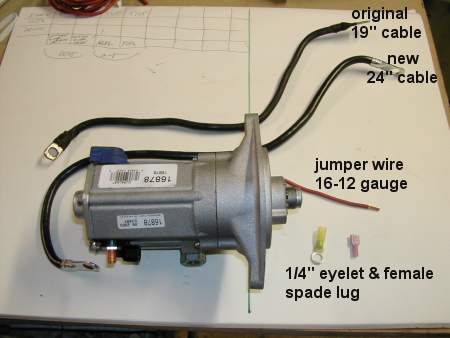
A couple of components are needed for the conversion. A slightly longer power cable is needed to reach the V+ connection on the bottom of the starter. Since the mechanism that 'pops-out' the starter gear is also the solenoid plunger, a jumper wire needs to be fashioned to engage the gear when power is applied. A simple 5/16" eyelet, a 1/4" female spade terminal, and a 2-3" piece of 16-12 gauge wire is all that's needed. |
 solenoid jumper and power terminal |
Simply
connecting the solenoid terminal to the main power connection will engage the starter
whenever power is applied to via the original firewall mounted solenoid. I used a 90° spade lug for my jumper to keep things neat, short and direct. I also used a stock style solenoid boot cover on this main power connection. |
|
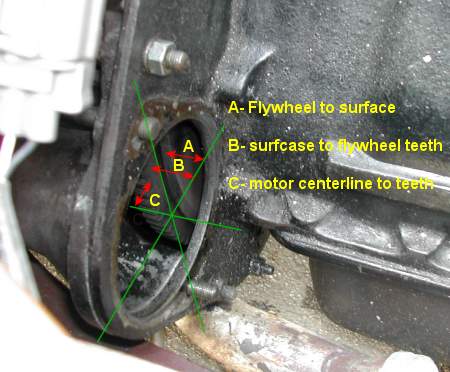
Now for the only
real tricky part...making sure the gears properly engage. At least on my GT6, the
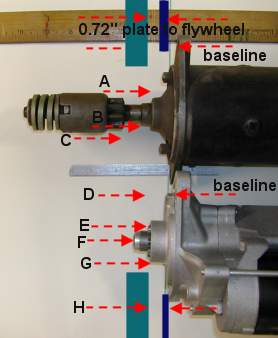
following dimensions were found: A- ~0.65" B- ~0.72" C- ~0.775" Well both drive gears are identical so no problem with dimension C.
|
|
Well I had a bunch of dimensions for this photo but the only one's you need to concern yourself with are the mount surface of the new starter to the edge of the ring gear. This will determine how thick the spacer need to be to have full engagement of the gear teeth. (Dimension 'D' on the new starter as compared to dimension B on the old starter). Some Lucas starters have a few thin shims installed as well as the thick spacer mount plate. |
|
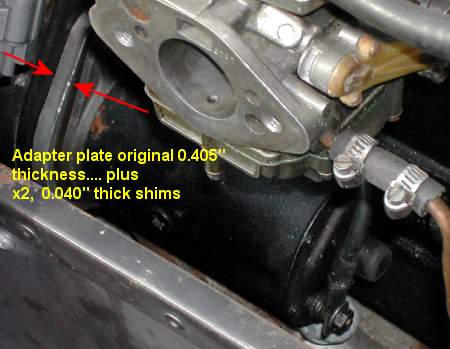
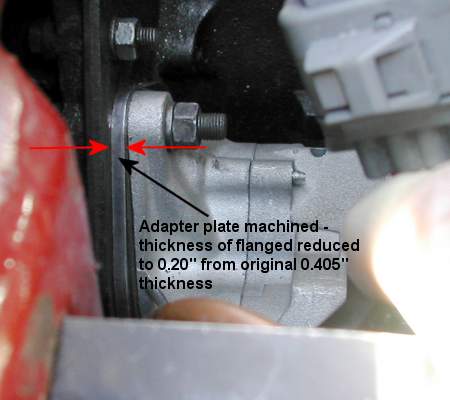
The original mount plate
(mine anyway) was roughly 0.405" thick, and had two thin spacers installed. So I
needed to thin it out the big plate a bit to get full gear mess. Going by my measurements,
I decided I needed the main spacer / mount plate to be 0.200" thick. I looked
in the phone book for a machine shop, and found one near by. In under an hour I had the
spacer back in hand for under $30.
|
|
Now the main spacer plate is machined to accept a tight fit on the starter and position it properly in the motor back plate hole. So I had the shop machine down the thickness of motor mount plate side on the engine starter side rather than the starter motor side, as well as the 'ridge' that centers it in the engine mount plate. If you don't 'shorten' the lip that goes into the motor back plate, it'll stick through too far, and in my case, contact the edge of the bell housing on the other side of the plate. This means they simply lathed down the rim and top of the ridge, by about .205" |
| So now that it's in, was it worth it? Any problems? Well so far it works great. Before installing this starter, my old battery would die, slowing the cranking to near uselessness after about 2 minutes worth of cranking in very cold weather (intermittent cranking of no more than 20 seconds at a time) Now with the same battery, I can crank the motor over for more than 5 minutes worth (intermittently) without problems. It's apparent, the new starter requires a lot less current to turn the engine over. Some people have stated a concern about the gear messing properly, as the old starter and the ring gear were 'chamfered' to enable proper messing if just slightly out of alignment (tooth to tooth mesh). So far out of roughly 100 starts, maybe..I say maybe... one time... do I 'think' the gear might have hit head on without meshing the first time. (the starter motor just spun with a slight 'whizzing' sound. At least for now it'll stay in the car. When warmer weather comes around it should be interesting to see if it spins the motor even faster. Just for reference.... it's been averaging 25°F here while all this testing was going on. So in the middle of the summer it should REALLY spin the motor like crazy! As a final note.... including the new power cable (~<$8) (which you'll need for the 'EBay Starters as well), the little jumper pieces (~<$2), the machining of the starter mount plate, ($30) were still talking less than $100 for a high power fast spinning starter. So I guess I'm happy with it. 8^)
|
|
©1987-2008
All material copyright© Teglerizer 1996-2008last edited 03/18/10

hits since last reset


index