|
|
|
||||||||
|
|
|
||||||||
Whitey - 1975 Spitfire Specific Tasks and Procedures |
||||||
|
||||||
|
| Let me start by saying, refinishing your own dash is not hard. I
Personally, I believe it's harder to to take it all apart than it is to re-veneer and
varnish it. You'll find yourself spending as much time trying to decide what wood
grain to use as you did taking it all apart. (That is if you're not 'originality'
crazy)
|
| For me, it was a matter of modifying the dash to accept an extra
guage and clean up the layout a bit. I wanted an oil pressure gauge but didn't want to
stuff it all the way over in front of the passenger where the metal dash backing is cut
out for the GT6 air vent. I could have put it on the driver's side vent location, but
found it would have been visually obscured by the steering wheel.
|
| The only 'tricks' to doing this... patience and careful sanding.
Select a piece of veneer large enough to cover all three pieces of the dash, leaving you
with at least a 1" overhang around the entire parameter. Use carpenters glue. (the yellowish stuff). On a VERY flat table, lay down the veneer and apply a layer of glue to it. Not thick, but a good solid coverage. Take care you don't press it though and grain cracks and out onto the front surface you'll later be varnishing. Apply a layer of glue to the well sanded and pre-prepared plywood dash sections. Set the dash sections on the veneer and set MANY heavy books on it to 'press' it. You may want to flip over the whole assembly and check that there are no 'bumps' created by the glue before letting it set more than 1/2 hour. You could even roll it out with a standard kitchen rolling pin or Formica counter top installation roller. But be careful not to crack the veneer near the gauge holes and around the parameter. Let it dry over. You can now CAREFULLY, with a very sharp razor blade, score lines to separate the three sections. You should now have a nice continuous grain pattern across the entire dash. Carefully trim the parameter edges before starting on the dash holes. Trim the holes to within about 1/16"- 1/32" of the final hole size. I glued first a piece of 220 grit than 600 grit sandpaper to a medicine bottle to use as a 'preformed' sanding block for the gauge holes. This is where the patience comes in. You should be able to get nice clean edges around the holes. You'll also be sanding a bit of the glue that squeezed out while pressing. As far as staining or varnishing... the options are wide open. In my case, I used clear polyurethane. No color added at all. The Tigerwood I used had enough color as the photos below show. I brushed on the first two coats, lightly steel wooling them in between coats. I then sprayed on the last three coats. Follow the directions on what ever coating you use and take your time. You'll be very happy showing off your new dash and being able to tell people you did it yourself! |
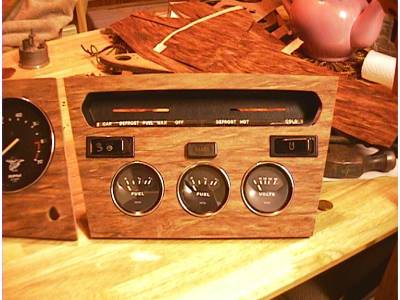
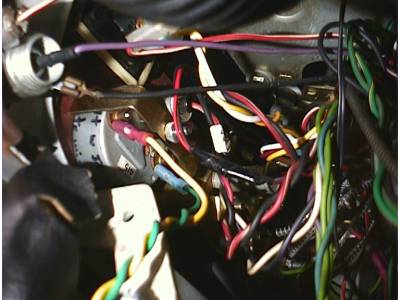
The gauges were only temporarily installed in the dash for this
photo. The veneer is Tigerwood and as yet unvarnished
in this shot. A second fuel gauge was stuck in the middle
where the dual oil press/water temp guage will go.

I relocated some of the 'idiot' lights, and chose not it
reinstall some of them. It's up to you. The center panel
has an extra light switch that is for the fog lights. The
new dual oil pressure, water temperature gauge is mounted
where the original light switch would have been.
Notice the turn signal indicator is now where the HAZARD
dash light use to be. The dash mounted
(1975 vintage car and dash) wiper switch is used as a
manual override to turn on the radiator electric fan.
A turn signal idiot light is used as a 'fan on' indicator.
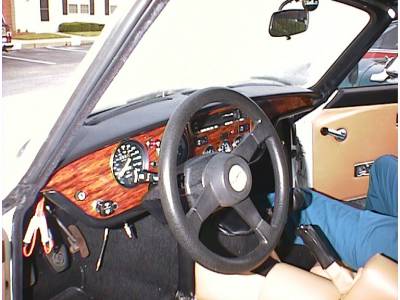
Yes, the entire steering column has been replaced
with a 1979 vintage unit. I prefer the 'stalk' mounted
switches and ignition key location.
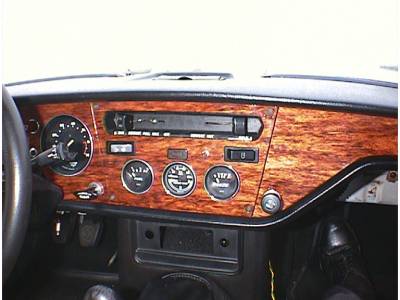
A single BRAKE idiot light was left in place. The little
silver dot between the right switch and the BRAKE
idiot light is the alarm system indicator.
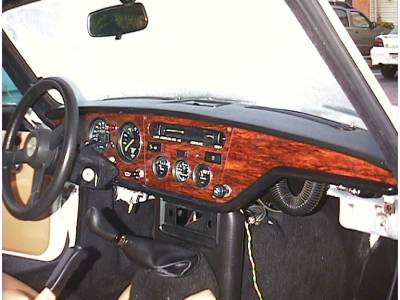
The veneer was covered with 5 coats of Clear Polyurethane.
No color added. The last three coats were sprayed on.
For the technically minded builders out there... yes it was a
tight fit on the extra gauges and the new switch locations.
If you look carefully you can see the white plastic switch clip
and how it just touches the black ear of the vent box panel
mount ear. I didn't move the gauges down (stock location)
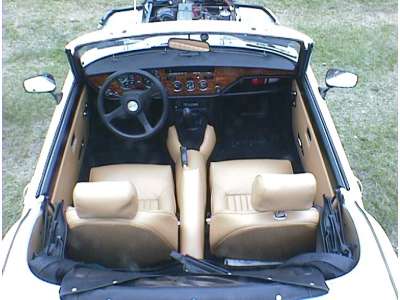
The Tigerwood really lends a nice contrast
to the Biscuit and black interior.
©1987-2010
All material copyright© Teglerizer 1996-2008last edited
3/15/08

hits since last reset

