|
|
|
||||||||

Have you found this site useful? ...Help keep it on-line
Whitey's Engine Rebuild -
New Rings & Grinding Proper end gap
Whitey - 1975 Spitfire Specific Tasks and Procedures |
||||||
|
||||||
|
11/21/01
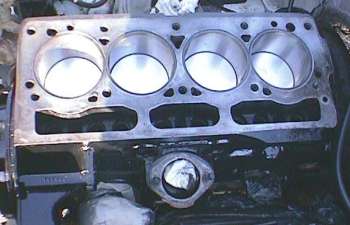
The New RingsWell the AE rings supplied with the flattop pistons (std. size) were not going to cut it. The honing had opened up the cylinders to ~2.903" from the stock ~2.900". The meant the stock ring end gap was very nearly out of spec before they would ever 'seat'. Measurements confirmed this. So I bought a set of 0.010" oversize rings. (yes...010, not 020, but 010 oversize) Ted Schumacher at TSI came up with a supply source. Hastings (great tech site) still produce 010's. |
 |
|
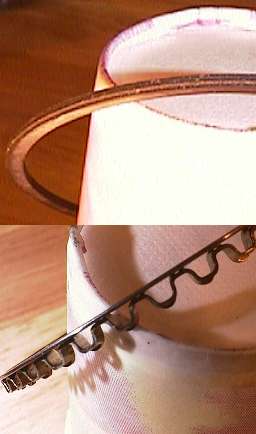
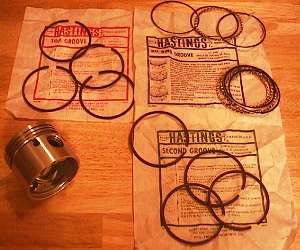
I like these rings better than the first set of
AE rings I received. These too, are cast iron rings with a Manganese phosphate (black)
coating. This helps retain oil on the surface of the ring. The top ring is a standard
square ring, with the top back compression relief. The second ring (pictured at left, has
a lower edge wiper groove to help control oil on the cylinder walls. The Patented inner spring ring for the oil rings (below left) is very interesting as it spreads the two oil control rings in the groove as well as thrusts them out against the cylinder walls in a very precise manner. Now being over size, as Soon as I put one in the cylinder bores, my affirmations were confirmed. I need to cut the end of the rings for proper end gap tolerances. This means matching the rings in sets to each cylinder bore. |
The Grinder |
|
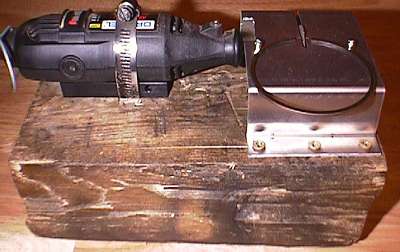
| I had seen pictures
of devices for properly grinding new end gap clearances but wasn't about to spend the
money they wanted for them. Plus,... how often are you going to do this. So I made my own
grinder.
|
|
|
|
| I scraped together a few odds and ends, and built this 'mini table saw' from a piece of scrap aluminum and my Dremel tool. A Simple 'omega' bend in the aluminum makes up the table. A small 'L' bracket screwed down to the base block, with hose clamp to hold the Dremel tool. Everything was 'cut-to-fit'. The Table layout (omega bends) were laid up on a piece of graph paper to estimate size and height needed to clear the Dremel tool spindle. | |
|
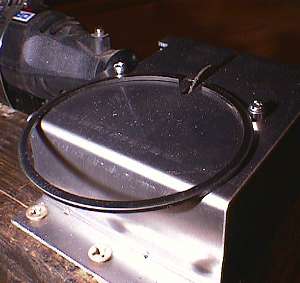
The two small 'tits' are small bearings from an R/C
car ( A stack of washers would have worked as well) to help guide the ring
squarely, as you grind both ends of the ring evenly and parallel to each other. The Dremel tool is rotating towards the rings center. This will leave the leading edge of the filing (the cylinder wall surface) burr free. |
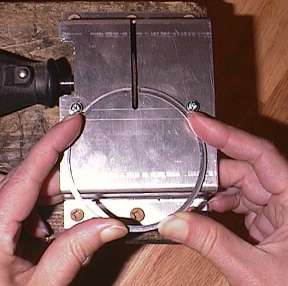 |
With 2-4 fingers hooked under the table edge, two to hold the ring flat on the table, you simply press the ring in against the bearings to have both ends of the ring touch the Dremel cut-off wheel sides to grind a tiny bit at a time. Stick the ring in the cylinder, measure the end gap, and repeat as necessary. This should cut a lot of time off the actual grinding and fitting process. The first tests on one of the old rings amazed me how perfectly parallel the ends grind. |
The New Pistons |
One of the new flat top pistons with the 0.010" oversize, custom cut 'per cylinder' gapped Hastings rings and three piece oil ring all installed. Just waiting for it's oil bath and installation.
|
Before installing the cam/distributor drive gear, try this....
|
![]()
©1987-2010
All material copyright© Teglerizer 1996-2008last edited
3/15/08

hits since last reset