|
|
|
||||||||
|
|
|
||||||||
Whitey - A 1975 Spitfire 6 Cylinder and Fuel Injected Conversion |
||||||||||
|
||||||||||
|
||||||||||
|
||||||||||
|
||||||||||
|
| It's a bit
crazy to not upgrade the rear brakes when upgrading the fronts. It's the
only way to keep the brake bias balanced front to rear. Now the cool
part is... this is actually just as easy as the front brake upgrade.
The late MKIII GT6 rear brakes were larger than any of the Spitfires and
or earlier GT6 models. The brake backplates are directly swappable
and the larger late MKIII plates will bolt right onto the stock Spitfire
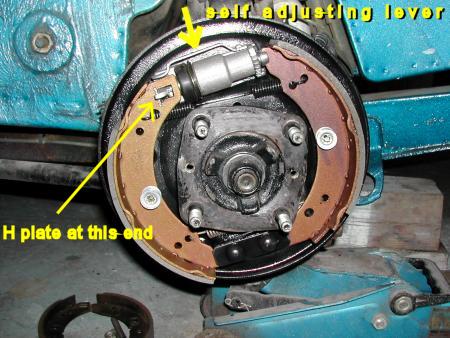
rear trunnions. The MKIII rears are also self-adjusting.
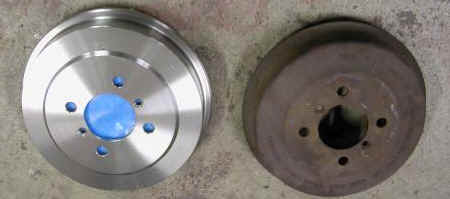
I went ahead and purchased brand new rear drums for the late MKIII setup used here. They're a bit heavier as well as machined just abit differently than the originals.
I did have to countersink the holes for the two screws that hold the drum to the hub. The metal is just a tad thicker than the originals. Without the countersink, the little screws only bit in with one or two threads.
You can see here that the lower shoe mount, has no adjustment cam. It's simply a holder. The upper cylinder has a threaded screw in spacer in one end of the cylinder. The act of pulling up on the handbrake, moves the lever across the toothed wheel that unscrews the cam as shoe wear occurs. The extends the distance between the tops of the shoes to take up the freeplay due to shoe wear. This is normally done while backing at slow speeds, which re-centers the cylinder on the back plate as adjustments are made. It will only adjust as much as needed as the lever will not catch another tooth until the shoes wear a bit more under normal operation.
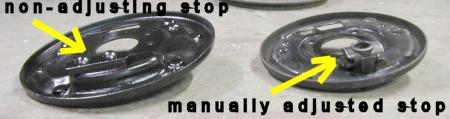
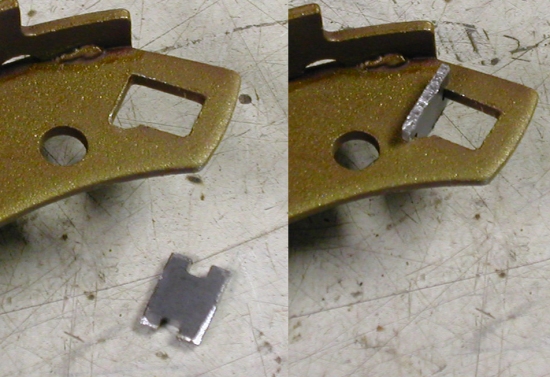
The biggest problem I think most people have with this brake setup is the little 'H' bar that is often missing from a properly installed set of shoes. I too had to simply make a set as they were missing here as well and are simply not available from anywhere. The 'H ' is the main 'push' surface that the park brake lever pushes against on the left shoe at the left cylinder end. It's just visible in the picture of fully assembled brake setup above. this last picture.
|
oh... that last pic... the blue is close to what it really looks like.
|
![]()
©1987-2010
All material copyright© Teglerizer 1996-2008last edited
3/15/08

hits since last reset